Take This Waltz

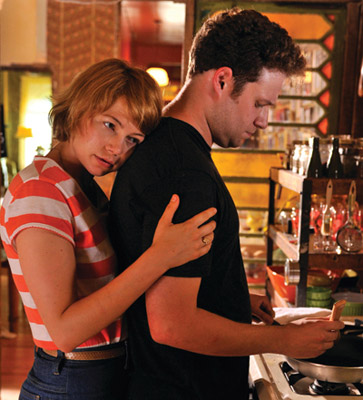
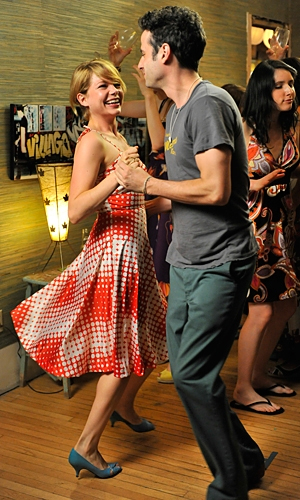
During the summer Matt and I stayed a night at his parents home in the Beaches in the East end of Toronto. We went to see Take This Waltz at the Fox Theatre. The Fox Theatre opened in 1914 and is the oldest running movie theatre in Canada. I would eventually like to do a post on this theatre as it is absolutely amazing, but I felt like sharing some of Michelle Williams wonderful outfits from this movie first.

Take This Waltz is an absolutely heartbreaking coming of age story that is at times uncomfortable. I won’t go into a synopsis about it because I am not a movie critic, but I would definitely recommend it. The movie is also filmed and set in Toronto, which I felt was nice, being a Torontonian myself.  But the one thing that held my attention throughout was the adorable dresses, rompers, high waisted shorts and stripes that she wore in the movie. She flip flops between being a little tomboy-ish, to wearing adorable 1960’s-7o’s summery dresses. I thought that was rather nice, as I have such troubles not constantly dressing like a textbook version of a girl. Her outfits felt effortless to me, in the best way possible. Any movie I see Michelle Williams in, I tend to believe whatever she wears/however she acts, is very close to her true self.


takethiswaltz1

take

waltz

You should definitely give the movie a watch, not only for her adorable outfits, but for the great story line as well.

Posted by Alex

City of Craft

L1180407

This weekend was insanely busy for both Alex and I, but we knew we needed to make time to squeeze in at least one of the million craft fairs going on in Toronto this weekend. We wandered over to City of Craft Sunday afternoon, and it didn’t disappoint. I’m always amazed by craft fair vendors, who travel with all of their merchandise, and set up the most beautiful tables and still manage to look perfectly put together and not frazzled in the least. Having a few friends who have had tables at fairs like this one before, I’m fully aware of how much preparation is involved, and everyone does such an amazing job!

We didn’t get to spend nearly as much time browsing as I would have liked, but we did run into my friend Yana from Montreal who is the genius behind Supayana. She designed a collection of baby clothes not too long ago (as well as an amazing collaboration with Olivia Mew!), and if I had even one friend with a baby girl, you can bet those cosmic kitten baby leggings would have been in my bag in no time.

Being at things like this always gets me feeling like I need to do way more crafty projects, so, hopefully the motivation sticks and I can come up with some exciting new DIY posts!

For a list of vendors who were selling at City of Craft, click here.

L1180406

L1180408

L1180412

L1180410

Posted by Meaghan

Etsy How-to: Packaging

photo 2(4)

One of the greatest parts about running an Etsy shop is sending an item off to its new owner. As a buyer, ordering an item online is always fun because, no matter what, it always feels like a gift when it arrives. We’ve always loved it when Etsy sellers throw in little surprises to make opening a package that much more exciting, so, we knew we wanted to package our items with special care so our buyers have something fun to open when their item arrives!

photo 5(2)

We wanted our packaging to reflect the aesthetic of our shop, which is fairly old-time-y. We both like old photos a lot, and we thought adding some buttons and tying it all together with some yarn would keep with the theme of antique-y looking gift wrap. The fun thing about it is that you can sort of personalize the wrapping for each item you send out! Whenever we’re out thrifting, we tend to keep our eyes open for things like old maps, old photos, old buttons, or even old newspaper. All of those things can be really nice accents, and then your basic packing supplies really don’t need to be very fancy, some tissue paper, or brown paper, will do the trick just fine.

photo 3(3)

photo 1(3)

In the end, we hope that our buyers will be excited to receive their new item, and that the little extra surprises will put a smile on their faces when they receive their purchase.


photo 3(4)

posted by Meaghan & Alex

DIY Wednesday: Nanaimo Bars

Today’s DIY is more of a recipe I’d like to share. With the holidays around the corner, I have a tendency to get especially into baking so that I always have treats to bring to holiday parties. Nanaimo bars are one of my favourites to eat, and also to make, because they involve a bunch of steps, and I like baking projects that keep me busy for a little while. The bars do require quite a number of ingredients, but all of them are easy to find at any grocery store. I actually just stole this recipe from my friend Danielle, who got it from the Nanaimo, British Columbia website. You can find the original recipe here, or just read on, I only made two minor changes.

photo 5(1)

photo 2

Bottom Layer:

Ingredients:

½ cup unsalted butter (European style cultured) (You can sub in margarine for this layer and it won’t make too big a difference)
¼ cup sugar
5 tbsp. cocoa
1 egg beaten
1 ¼ cups graham wafer crumbs
½ c. finely chopped almonds (I used chopped walnuts instead!!!)
1 cup coconut

Melt first 3 ingredients in top of double boiler. Add egg and stir to cook and thicken. Remove from heat. Stir in crumbs, coconut, and nuts. Press firmly into an ungreased 8″ x 8″ pan

photo 1(1)

photo 2(1)

Middle Layer:

Ingredients:

½ cup unsalted butter (You can also sub in margarine for this layer without sacrificing taste)
2 Tbsp. and 2 Tsp. cream
2 Tbsp. vanilla custard powder
2 cups icing sugar

Cream butter, cream, custard powder, and icing sugar together well. Beat until light. Spread over bottom layer.

photo 3(1)

Top Layer:

Ingredients:

4 squares semi-sweet chocolate (1 oz. each) (I actually used more than 4 squares because I like them to be extra chocolatey!)
2 Tbsp. unsalted butter (For this top layer I like to use real butter because it makes it taste so much richer)

Melt chocolate and butter over low heat. Cool. Once cool, but still liquid, pour over second layer and chill in refrigerator.

Frances Baker Summer 2012

frances baker

I had been anticipating the launch of Frances Baker Summer collection for awhile now. And finally, starting last week and throughout, Josie began revealing pieces from her collection, and oh my, it did not disappoint! With this collection she pretty much summed up how I like to dress in the summer. Something simple, light-weight, but has such lovely details to it that you don’t feel too dressed down. From what I read on her blog,  this was her intention, and she executed it perfectly.

Now, I shouldn’t be so cruel and torture myself with summer collections, as it has officially become winter here in Toronto. Our first snow fall was just a few nights ago. I can’t even really foresee myself wearing anything like this for the next coming months, but these photos brighten the dark days here and get me excited about the long-coming summer season. I think maybe my favorite thing about this collection is the 70’s feel. I’m pretty into that right now. The long floral dresses and overall dress really speak to my sensibilities right now. The ruffle details on the longer dresses really add something nice, making them super feminine in the best way possible. I also love all the pieces being paired with clogs – i love clogs –  it really adds to the 70’s vibe of the whole collection. All in all, I’d like to get my hands on some of these pieces and make them a part of my summer closet.

dress

frances baker

hannah dress

overall dress

Posted by: Alex